As one of the most in-demand programming languages in the tech industry, JavaScript is a must-know for developers looking to excel in web app development. With a high demand for professionals skilled in JavaScript, it’s important to be prepared for the types of questions that might come up during an interview. Here are the top 10 JavaScript interview questions that you should expect to be asked in an interview.
Securing a position at a top technology company like TCS, Accenture, or IBM is a coveted goal for many job seekers. However, landing a job at one of these firms requires acing a series of technical and non-technical interviews.
To give you an edge in the process, we’ve compiled a list of commonly asked JavaScript interview questions that are likely to come up during interviews at these top companies. Being prepared with answers to these questions can help increase your chances of success.
Please have a look at them.
Can you explain the differences between a class and an object in JavaScript?
How do you optimize the performance of a JavaScript application?
Can you explain the role of the Document Object Model (DOM) in JavaScript?
How do you handle errors and exceptions in JavaScript?
Can you explain the concept of event bubbling and event capturing in JavaScript?
How do you implement asynchronous programming in JavaScript?
Can you explain the difference between a closure and a callback in JavaScript?
How do you use the jQuery library in JavaScript?
Can you explain the concept of hoisting in JavaScript?
How do you use AJAX to make asynchronous HTTP requests in JavaScript?
Having a solid understanding of these concepts and being able to explain them clearly and concisely will help you impress the interviewer and increase your chances of getting the job.
https://www.ashramtech.com/wp-content/uploads/2023/01/JavaScript-Interview-Questions.webp4451140Ashram Techhttps://ashramtech.com/wp-content/uploads/2020/05/ashramtech-logo-icon-e1595685534504.pngAshram Tech2023-01-28 16:34:422023-01-28 16:34:42Prepare for your next tech giant interview: Top 10 frequently asked JavaScript interview questions
When seeking help with the issue to install and activate woocommerce with php 8, you may be facing critical error:
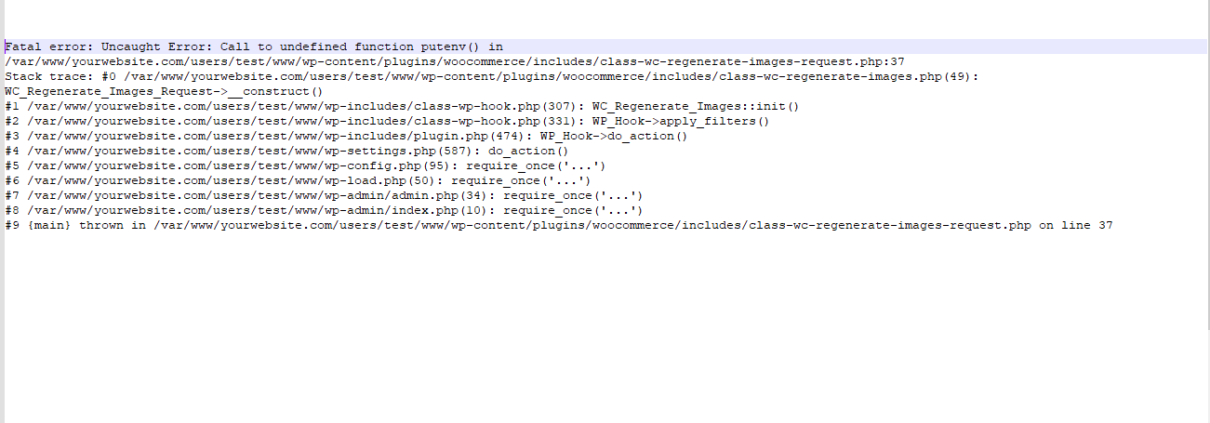
and once you try to debug the things you may end with something like:
Fatal error: Uncaught Error: Call to undefined function putenv() in /var/www/yourwebsite.com/users/test/www/wp-content/plugins/woocommerce/includes/class-wc-regenerate-images-request.php:37 Stack trace: #0 /var/www/yourwebsite.com/users/test/www/wp-content/plugins/woocommerce/includes/class-wc-regenerate-images.php(49): WC_Regenerate_Images_Request->__construct() #1 /var/www/yourwebsite.com/users/test/www/wp-includes/class-wp-hook.php(307): WC_Regenerate_Images::init() #2 /var/www/yourwebsite.com/users/test/www/wp-includes/class-wp-hook.php(331): WP_Hook->apply_filters() #3 /var/www/yourwebsite.com/users/test/www/wp-includes/plugin.php(474): WP_Hook->do_action() #4 /var/www/yourwebsite.com/users/test/www/wp-settings.php(587): do_action() #5 /var/www/yourwebsite.com/users/test/www/wp-config.php(95): require_once(‘…’) #6 /var/www/yourwebsite.com/users/test/www/wp-load.php(50): require_once(‘…’) #7 /var/www/yourwebsite.com/users/test/www/wp-admin/admin.php(34): require_once(‘…’) #8 /var/www/yourwebsite.com/users/test/www/wp-admin/index.php(10): require_once(‘…’) #9 {main} thrown in /var/www/yourwebsite.com/users/test/www/wp-content/plugins/woocommerce/includes/class-wc-regenerate-images-request.php on line 37
Fatal error With WooCommerce and PHP 8 Details
An error of type E_ERROR was caused in line 37 of the file /wp-content/plugins/woocommerce/includes/class-wc-regenerate-images-request.php. Error message: Uncaught Error: Call to undefined function putenv() in /wp-content/plugins/woocommerce/includes/class-wc-regenerate-images-request.php:37
Solution
It sounds like this function is being deliberately disabled via the disable_functions directive. A workaround, assuming a fairly standard WordPress setup, would be to create a new file at:
wp-content/mu-plugins/putenv.php
Containing:
<?phpif ( ! function_exists( 'putenv' ) ) {
/** * No-op placeholder for cases where putenv() is disabled via an .ini file. * * @param string $assignment */functionputenv( string$assignment ) {}
}
This might just help you to workaround this issue, however the very best course of action would be to make a correction to your PHP config (working with your web host if necessary to achieve this).
The code that calls putenv() has been in place for over 4 years and this seems to be the first time the problem has arisen (though, search functionality over on the wordpress.org is not working at time of writing—too many requests), so I may be missing something, but my inclination is that it would still be best to work things out per the above notes: this is a standard PHP function, not something that is coming from an optional extension, so it’s reasonable for us to expect it to be available.
https://www.ashramtech.com/wp-content/uploads/2022/10/fatal-error.png5301301Ashram Techhttps://ashramtech.com/wp-content/uploads/2020/05/ashramtech-logo-icon-e1595685534504.pngAshram Tech2022-10-15 17:20:002022-10-15 17:20:00How to fix Fatal error With WooCommerce and PHP 8 : Call to undefined function putenv()
WP Super Cache, one of the oldest and most widely used static caching plugins for WordPress, is changing hands. After 15 years, the plugin’s author, Donncha Ó Caoimh, is handing over maintenance and development to Jetpack’s performance team.
Jetpack’s performance team manages the Jetpack Boost plugin, used by more than 100,000 sites, and the CDN. In today’s announcement, Jetpack assured current users that they will still be able to “enjoy its core features without a new plugin or a connection to Jetpack.”
More of the same
We’re happy to say that WP Super Cache will continue to be a great way to speed up your site for free. You can enjoy its core features without a new plugin or a connection to Jetpack.
What will be changing
While we research new features to help make WordPress sites cache faster, we will begin updating the WP Super Cache UI to bring it in line with modern standards, so it is easier to use. In addition, we’ll be working behind the scenes to ensure it’s compatible with our other performance features like Jetpack Boost.
Speed up your site
For those that aren’t familiar, WP Super Cache is a static caching plugin for WordPress. It generates HTML files served directly by Apache without processing comparatively heavy PHP scripts. This simple step should speed up your WordPress site significantly.
https://www.ashramtech.com/wp-content/uploads/2022/09/jetpack-wpcache-blog-post-blog.webp528839Ashram Techhttps://ashramtech.com/wp-content/uploads/2020/05/ashramtech-logo-icon-e1595685534504.pngAshram Tech2022-09-24 21:28:272022-09-24 21:28:27Jetpack Team Takes Over WP Super Cache Development
Adobe Inc. is set to acquire Figma Inc. for roughly $20B, deal ranks as Adobe’s largest deal to date.
San Jose, Calif.-based Adobe agreed to acquire Figma in a cash-and-stock deal worth about $20 billion, a Sept. 15 news release said. Figma stockholders will get about $10 billion in cash and approximately $10 billion in stock, subject to adjustments.
Combination of Adobe and Figma Will Usher in New Era of Collaborative Creativity
Adobe’s mission is to change the world through digital experiences. Today, the digital economy runs on Adobe’s tools and platforms, and throughout its history, the company’s innovations have touched billions of lives across the globe.
Figma’s mission is to help teams collaborate visually and make design accessible to all. Founded by Dylan Field and Evan Wallace in 2012, the company pioneered product design on the web. Today, it is making it possible for everyone who designs interactive mobile and web applications to collaborate through multi-player workflows, sophisticated design systems and a rich, extensible developer ecosystem. Figma has attracted a new generation of millions of designers and developers and a loyal student following.
Together, Adobe and Figma will reimagine the future of creativity and productivity, accelerate creativity on the web, advance product design and inspire global communities of creators, designers and developers. The combined company will have a massive, fast-growing market opportunity and capabilities to drive significant value for customers, shareholders and the industry.
Reimagining the future of creativity and productivity
Adobe Chairman and CEO Shantanu Narayen expressed confidence in the company’s future after acquiring Figma, even as Adobe deals with an increasingly widening customer base that includes students, creative professionals and businesses.
“We are in the golden age of design, and we believe we have a unique opportunity to usher in a new era of collaborative creative computing,” Narayen said in the company’s Sept. 15 earnings call.
About Figma
Figma is a design platform for teams who build products together. Born on the web, Figma helps teams brainstorm, design, and build better products— from start to finish. Whether it’s consolidating tools, simplifying workflows, or collaborating across teams and time zones, Figma makes the design process faster, more efficient, and fun while keeping everyone on the same page.
About Adobe
Adobe is changing the world through digital experiences. For more information, visit www.adobe.com.
https://www.ashramtech.com/wp-content/uploads/2022/09/figma-adobe.png5181074Ashram Techhttps://ashramtech.com/wp-content/uploads/2020/05/ashramtech-logo-icon-e1595685534504.pngAshram Tech2022-09-17 18:23:062022-09-17 18:23:06Adobe is set to acquire Figma for roughly $20B
If you are seeing an allowed memory size exhausted error in WordPress? This is one of the most common WordPress errors, and you can easily fix it by increasing the php memory limit in WordPress. In this article, we will show you how to fix WordPress memory exhausted error by increasing PHP memory.
What is WordPress Memory Exhausted Error?
WordPress is written in PHP server-side programming language. Every website needs a WordPress hosting server for it to function properly.
Web servers are just like any other computer. They need memory to efficiently run multiple applications at the same time. Server administrators allocate specific memory size to different applications including PHP.
When your WordPress code requires more memory than the default allocated memory, you get to see this error.
Fatal error: Allowed memory size of 33554432 bytes exhausted (tried to allocate 2348617 bytes) in /home4/xxx/public_html/wp-includes/plugin.php on line xxx
The error can occur in a number of different circumstances. However, it’s most likely to arise when you take specific types of actions on your site, such as:
Installing and activating a new theme or plugin.
Uploading images and other media to your site.
If you’ve run into this error on your own WordPress site, don’t worry. The reasons behind it are simple – let’s talk a little more about why it occurs.
Increasing the WordPress Memory Limit
To address memory limit issues, there are two paths:
Adjust yourself
Contact your hosting company
Do It Yourself
To adjust on your own, here are some methods to try. Be aware that this section requires advanced knowledge; it is not basic.
Edit your wp-config.php file
Add this to the top, before the line that says, “Happy Blogging”:
define('WP_MEMORY_LIMIT', '256M');
WordPress memory can be different from the server – you need to set this regardless of server memory settings
If you have access to your PHP.ini file, change the line in PHP.ini
If your line shows 64M try 256M:
memory_limit = 256M ; Maximum amount of memory a script may consume (64MB)
Edit your .htaccess file
If you don’t have access to PHP.ini try adding this to an .htaccess file:
php_value memory_limit 256M
Contact Your Host
Should you not feel comfortable in trying the above methods, or the above did not work for you, you need to talk to your hosting about having them increase your memory limit.
How To Fix Contact Form 7 Error: Email not sending
Contact form 7 is a free WordPress plugin that helps you to easily create forms and place them anywhere on your website. Contact form 7 is one of the most widely used plugins on WordPress with over 5 million active downloads. However, I have found that some of the forms sometimes may stop working or have problems when trying to send a message. Most times you will get a message with a colored border saying “An error occurred while trying to send your message. Please try again later.”
Depending on the color of the border surrounding the message, it will determine the fixes we needed.
The yellow error tells us that there is an error with form validation. This will be something we need to change in the admin area.
Forms Not Validated
Go to your WordPress admin dashboard and you will see icons on the Contact Form 7 plugin menu. Click on the “Contact Forms” menu so that we see the error in detail:
Once you get to the forms page, near the top you will see an error message like the image below. Click on the link within this message to fix the problem.
That page will take you to another page where you just need to simply click on the “validate form now” button.
This should fix the problem, but if not, then try other ways.
Orange Error Message Fix
The orange error tells us that your form isn’t sending because of a spam issue. Here are two solutions I did to fix this problem.
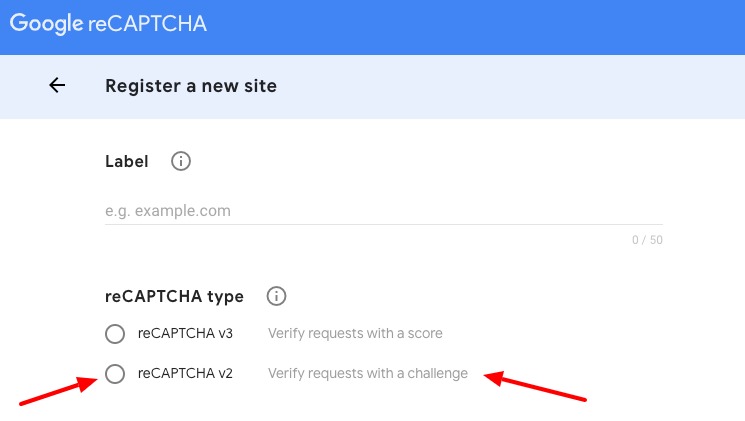
ReCaptcha v2
Contact Form 7 uses reCaptcha to make sure your website doesn’t receive a lot of spam. Once CF7 moved from reCaptcha V2 to V3, forms stopped working. The easiest solution that instantly fixed these issues for me was to change the reCaptcha back to V2. Here is what I did…
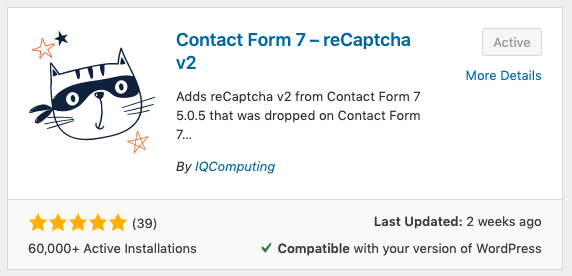
Go to the plugins page and search for “Contact Form 7 – reCaptcha v2“, install and activate it.
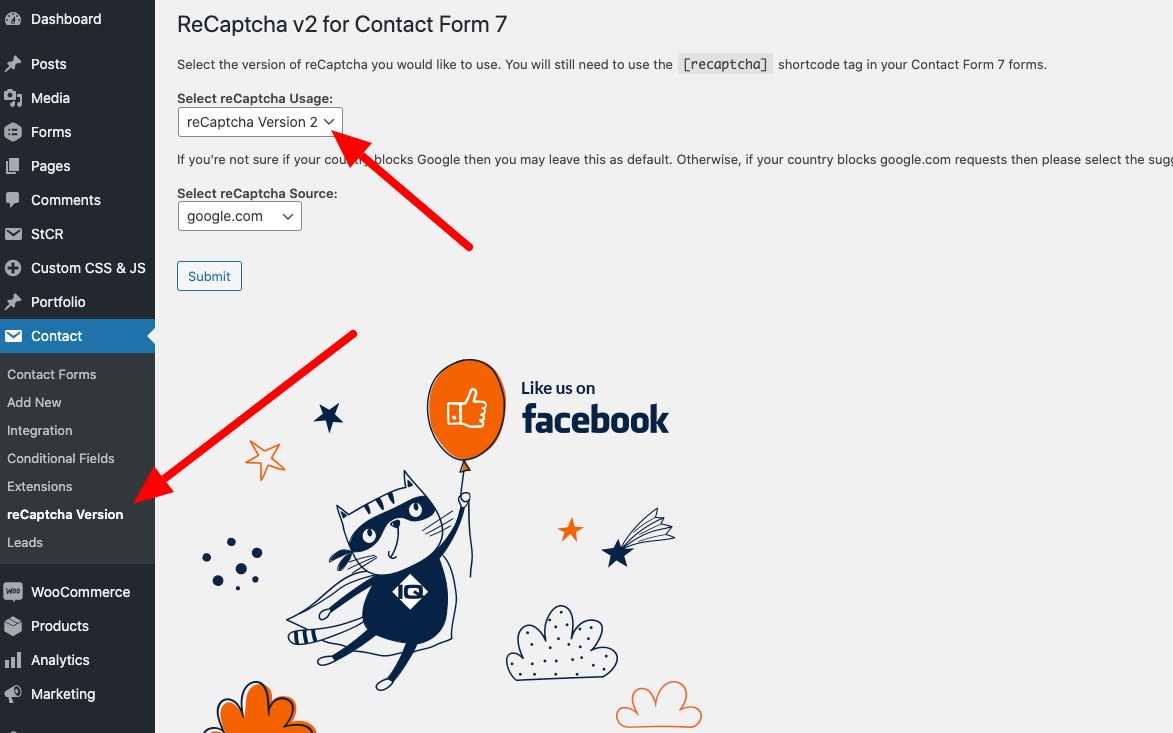
Next go to reCaptcha version and select Version 2.
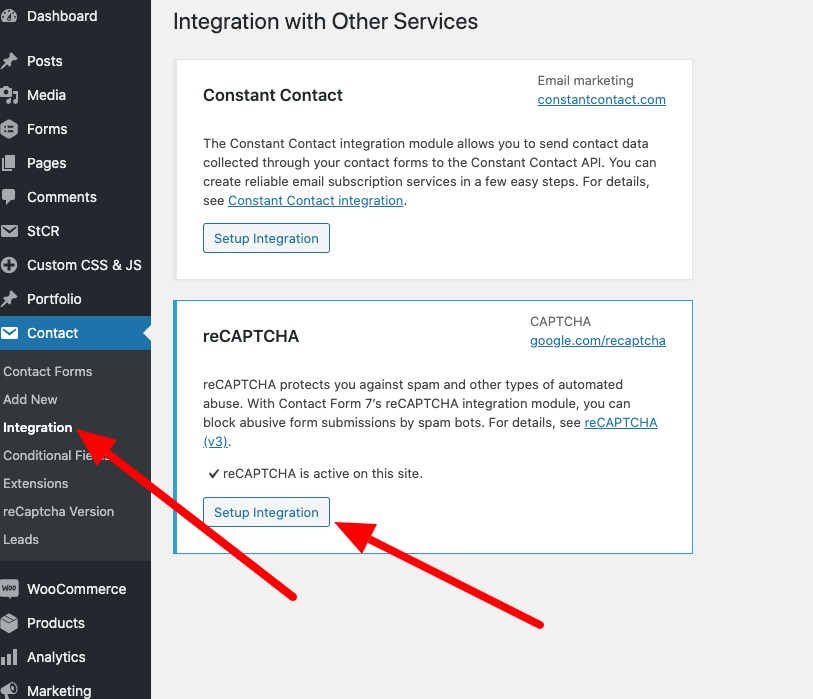
Next go to the Contact Form 7 tab and click on integration. Click on “remove keys”.
Next go to the Google reCaptcha page, sign in and create new site keys for your website. You might need to delete your website property from reCaptcha first. When asked for reCaptcha type, choose reCaptcha V2.
Once the keys have been generated go back to the integrations tab for Contact Form 7 and add your new V2 site keys.
Once you are done, click save then go back to your forms and add the “[recaptcha]” shortcode.
Red Error Message Fix
The red error tells us that the form is not sending and is caused by your server not sending the email. There are two solutions for this:
Contact Hosting Company
Contact your hosting company and tell them about the issue. They will most likely test the email function on your server and fix it or they will not have a solution which will bring me to the next fix.
Install SMTP Plugin
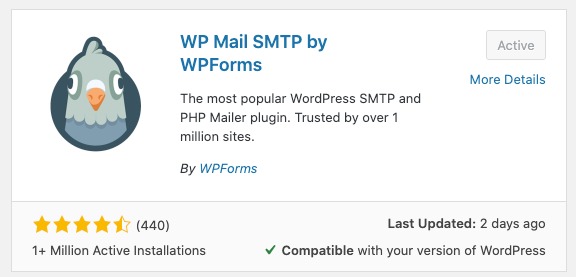
SMTP and php mail plugins make sure emails are authenticated and properly sent through third parties. The plugin I use to fix this was WP Mail SMTP you can use other SMTP plugins like Post SMTP.
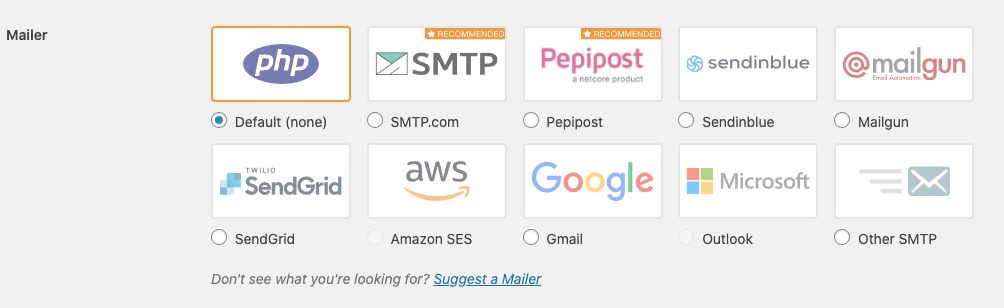
Once you downloaded and activate WP Mail SMTP, go to the settings page.
Go to one of the suggested mailers websites and sign up for an account. I’ve used Sendingblue, Google and SendGrid in the past. Once you create an account you will get an API key(s) and you will need to go back to that SMTP plugin settings page to enter your API keys. You will see a place to enter your credentials (see image below). This will appear below the mailer options on the SMTP settings page.
Once your API key is saved, go to the top of this page and you will see an option to send a test email.
Send a test email to make sure everything is working.
Other Things To Try
Caching plugin Conflicts
Another reason why your contact forms may not be sending messages is from caching plugins conflicts. The easiest way to test for this is to deactivate your cache plugin and try testing the form again. If it works, then you either need to find another cache plugin that doesn’t cause issues.
Still not working?
A while back I noticed that contact form 7 often had these annoying issues and they happened every time I updated the plugin. If you are frustrated with this plugin, you should switch to a another or a premium plugin as they usually come with support so you could get your issues fixed quickly.
https://www.ashramtech.com/wp-content/uploads/2022/07/contact-form-7.png306691Ashram Techhttps://ashramtech.com/wp-content/uploads/2020/05/ashramtech-logo-icon-e1595685534504.pngAshram Tech2022-07-23 15:46:572023-08-01 00:40:43How To Fix Contact Form 7 Error : Ultimate Guide -There was an error trying to send your message. Please try again later
WooCommerce is a popular e-commerce plugin for WordPress that provides a wide range of features and functionality to create online stores. One of the advantages of using WooCommerce is the ability to customize the appearance and layout of your store’s front-end by modifying the template files. In this article, we will explore the process of overriding WooCommerce template files in a professional and upgrade-safe manner.
WooCommerce templates serve as the backbone of the front-end presentation of your online store. By editing these files, you can modify the markup and structure of various pages, such as product listings, cart pages, and checkout pages. However, it’s important to follow best practices to ensure that your customizations are not lost during plugin updates.
To override WooCommerce templates, it is recommended to use a child theme, which is a separate theme that inherits the functionality and styling of its parent theme. This allows you to make modifications without directly editing the parent theme files, which can be overwritten during theme updates.
Create a child theme: If you haven’t already, create a child theme for your WordPress site. This involves creating a new theme directory and a style.css file with the necessary information to identify it as a child theme.
Locate the WooCommerce template file: Identify the template file you want to modify. You can find the default WooCommerce template files in the following directory: /wp-content/plugins/woocommerce/templates/.
Copy the template file: Using a file manager or FTP, navigate to the WooCommerce templates directory and locate the file you want to override. Copy this file to the corresponding directory within your child theme. If the directory doesn’t exist, create it. For example, if you want to modify the archive-product.php file, copy it to /themes/your-child-theme/woocommerce/archive-product.php.
Make desired changes: Open the copied template file in a text editor and make the necessary modifications to the markup, structure, or content. For instance, you can add custom notices, rearrange elements, or apply styling changes.
Save and upload: Save the modified template file and upload it back to the child theme directory, overwriting the existing file.
By following these steps, you have successfully overridden a WooCommerce templates, ensuring that your customizations will persist even after plugin updates.
It’s worth noting that WooCommerce templates are organized in a hierarchical structure, allowing you to override specific files for different pages or elements. By replicating the directory structure in your child theme’s WooCommerce directory, you can override templates for specific purposes.
Override example: Let’s consider an example where we want to add a notice to the price template on the single product page. Locate the price.php template file in the WooCommerce plugin directory: woocommerce/templates/single-product/price.php. Copy this file to your child theme’s directory: your-child-theme/woocommerce/single-product/price.php. Open the copied file and make the desired changes. In this case, we will add a notice about the price, such as excluding tax and shipping:
<?php

/**
 * Single Product Price
 */

global $post, $product;

?>
<p itemprop="price" class="price"><?php echo $product->get_price_html(); ?></p>
<p>Notice: price shown excludes tax and shipping.</p>
By utilizing this approach, you can override various aspects of the WooCommerce front-end UI, including HTML email templates, in a manner that minimizes the risk of losing your customizations during plugin updates.
In conclusion, overriding WooCommerce templates allows you to have full control over the appearance and structure of your online store. By following the recommended method of using a child theme, you can make modifications in a professional and upgrade-safe manner. Remember to carefully organize your custom templates within the child theme’s WooCommerce directory to target specific elements or pages. With these techniques, you can create a unique and tailored shopping experience for your customers using WooCommerce.
https://www.ashramtech.com/wp-content/uploads/2022/07/Override-WooCommerce-Template-Files.png12802560Ashram Techhttps://ashramtech.com/wp-content/uploads/2020/05/ashramtech-logo-icon-e1595685534504.pngAshram Tech2022-07-03 00:05:532023-07-17 16:20:04A Guide to Overriding WooCommerce Template Files: Professional and Upgrade-Safe Customizations in 5 Easy Steps
Elementor acquires Strattic, the leading WordPress static hosting solution for secure, high-performance websites. This decision strengthens our ability to provide an end-to-end solution to millions of Web Creators by harnessing the power of static hosting technology and marks a significant milestone for Elementor.
Israeli company Elementor, the developer of a building platform for WordPress websites, has acquired Strattic, a web development and hosting solutions outfit based in Jerusalem, in an all-Israeli deal announced on Wednesday. Calcalist said the transaction was estimated at “several million dollars.”
Founded in 2016 by Yoni Luksenberg and Ariel Klikstein, Elementor’s open-source, drag-and-drop platform allows web creators to build code-free WordPress-based sites. The no-code website building concept is similar to what Israeli company Wix created — just for WordPress, the global leader in content management systems (CMS).
Strattic was founded in 2018 by Josh Lawrence and Miriam Schwab, a web developer with years of experience with WordPress sites, who set out to solve the “noise” around managing and securing WordPress sites.
Schwab has said WordPress was the best website and content management system out there but managing the life cycles of WordPress sites can be time-consuming and cumbersome, demanding solutions to issues of security, performance and reliability — challenges she experienced first-hand as a web developer.
Since its founding in 2018, Strattic has spearheaded static architecture to run stable and reliable websites, making downtime a relic of the past and allowing for seamless scale. Websites running on Strattic are renowned for their lightning-fast website speeds no matter where visitors are in the world, as it uses pre-rendered static pages that are fully served by a CDN.
With static hosting, users can deploy their dynamic WordPress websites as static HTML/CSS replicas to global CDN networks, which drastically improves the performance of their sites and eliminates potential security vulnerabilities and site breakdowns during updates. With a dramatically reduced attack surface, WordPress vulnerabilities become irrelevant as security is no longer a defensive endeavor.
I firmly believe that Strattic’s technology, know-how, talent, and established market position as the leader of this technology in the WordPress space will allow us to offer the benefits of static hosting to the entire Elementor community and provide a platform for hosting ultra-performant large-scale websites — all in one place.
Elementor + Strattic = visions aligned
The value that Elementor brings to Web Creators aligns with our vision: removing the noise around managing WordPress so users can enjoy all the benefits that WordPress has to offer and focus purely on their work. With Elementor, that means Web Creators can easily build out new page layouts and designs and get content out there faster. With Strattic, developers and DevOps professionals can focus on their main responsibilities and stop worrying about the WordPress infrastructure of the company’s website and all that entails.
Between our aligned visions, passion for WordPress, and shared histories, joining forces with Elementor feels like a match made in heaven. We are very excited to see what we can accomplish together on this next stage of our journey.
The Future of WordPress Is High-Performing, Ultra-Secure, and Hyper-Stable Websites
Elementor has pioneered website design and building standards as WordPress’ fastest-growing web creation platform for the past six years, keeping in line with our founding vision of empowering web creators.
After years of powering millions of websites with our famous editor plugin, we remain committed to solidifying Elementor as the world’s best editor, while breaking new ground in delivering innovative experiences in designing, developing, and building the web.
With Elementor now behind them, the Strattic team, led by Miriam and Josh, will work with us to bring the static experience to millions of WordPress and Elementor users. This milestone is another step towards our shared vision of building the perfect platform for web creators.
What does this mean going forward?
Strattic will continue to provide you with a fast, secure and scalable solution for your WordPress website, with a continued fanatical commitment to excellent customer support. At the same time, joining with Elementor means we will be able to provide you with even more innovation in the static WordPress space and bring our vision to millions of users.
https://www.ashramtech.com/wp-content/uploads/2022/06/elementor_and_strattic-scaled.webp17072560Ashram Techhttps://ashramtech.com/wp-content/uploads/2020/05/ashramtech-logo-icon-e1595685534504.pngAshram Tech2022-06-11 15:59:112022-06-11 16:05:45Elementor Acquires Strattic: New Era To Redefine WordPress Hosting
Say hello to “Arturo” and WordPress 6.0, inspired by Grammy-winning jazz musician, Arturo O’Farrill. Known for his influence on contemporary Latin jazz, Arturo has pressed more than 15 albums spanning a body of work across five decades.
What’s Inside
Enhanced Writing Experience
Writing improvements abound, whether you’re writing a brand new post or adding elements to an existing page. Explore more ways to streamline your content creation process, including:
Select text across multiple blocks for easier copying and pasting.
Type two open brackets `[[` to quickly access a list of recent posts and pages.
Keep existing styles when you transform some blocks from one kind to another—from a Paragraph block to a Code block, for instance.
Create customized buttons and any new buttons you make will retain the style customizations automatically.
Make tag clouds and social icons even more appealing with updated settings and controls, and a new outline style for the tag cloud.
Style Switching
Block themes now include the option to contain multiple style variations. This expands the new Style system even further and enables shortcuts to switch the look and feel of your site all within a single theme. In block themes that support this feature, you can change both the available settings, like the font-weight, and the style options, like the default color palette. Change the look and feel of your site with just a few clicks.
More Template Choices
WordPress 6.0 includes five new template options for block themes: author, date, categories, tag, and taxonomy. These additional templates provide greater flexibility for content creators. Tailor each with the tools you already know or with the following new options in this release:
Featured images can be used in the cover block.
New featured image sizing controls make it easier to get the results you want.
While editing a template, at the root, or between blocks, the quick inserter shows you patterns and template parts to help you work faster and discover new layout options.
The query block supports filtering on multiple authors, support for custom taxonomies, and support for customizing what is shown when there are no results.
Integrated Patterns
Patterns will now appear when you need them in even more places, like in the quick inserter or when creating a new header or footer. If you’re a block theme author, you can even register patterns from the Pattern Directory using `theme.json`, enabling you to prioritize specific patterns that are most helpful to your theme’s users.
Additional Design Tools
Design tools grow more powerful and intuitive with each release. Some highlights for 6.0 include:
A new color panel design saves space, but still shows your options at a glance.
New border controls offer a simpler way to set your border exactly as you like it.
Transparency levels for your colors allow for even more creative color options.
Control gaps, margins, typography, and more on a collection of blocks, all at once, in the Group block.
Switch between stack, row, and group variations to position groups of blocks with more layout flexibility.
Use the gap support functionality in the Gallery block to create different looks – from adding spacing between all images, to removing spacing altogether.
Better List View
New keyboard shortcuts enable you to select multiple blocks from the list view, modify them in bulk, and drag and drop them within the list. List View can be opened and closed easily; it comes collapsed by default and it automatically expands to the current selection whenever you select a block.
Block Locking Controls
Now you can lock your blocks. Choose to disable the option to move a block, remove a block, or both. This simplifies project handover, allowing your clients to unleash their creativity without worrying about accidentally breaking their site in the process.
Improved Performance
This release includes several updates focused on improving the performance of WordPress. These enhancements cover a range of performance areas including improving the page and post-load speed, reducing the execution time of various query types, caching, navigation menus, and much more. The performance team working group is an important focus area of the core development team. For more information on this group’s work, please follow their work on Making WordPress with the #performance hashtag.
Enhancing Accessibility
Accessibility is an integral part of the WordPress mission of fostering an inclusive community and supporting users of all types around the world. With this in mind, WordPress 6.0 includes more than 50 updates specifically focused on enhancing the accessibility of the platform. You can read about these updates and learn more about the accessibility initiatives that are ongoing.
https://www.ashramtech.com/wp-content/uploads/2022/06/wordpress-6-0-1536x845-1.jpg8451536Ashram Techhttps://ashramtech.com/wp-content/uploads/2020/05/ashramtech-logo-icon-e1595685534504.pngAshram Tech2022-06-04 18:40:592022-06-11 15:35:35Whats new in WordPress 6.0 “Arturo”: A comprehensive guide
You know HTML, CSS, and JavaScript. You can make beautiful websites. Maybe you’ve heard about WordPress, but aren’t entirely sure how to implement it, or why you might need it. Maybe a client asked for WordPress, but you’re not really familiar with it. Maybe you’ve worked with it before, but don’t know how to make your own theme from scratch. Below is a list of general resources related to WordPress theme development, such as tutorials, tools, and more.
PREREQUISITES
All you need to start is a website. Any website will do. You don’t need to know any PHP, or have any prior experience with WordPress. Your website can be custom, or built on Bootstrap/some other framework.
As the title states, some of the most common theme development mistakes and how to avoid them.
Problem: You want to create a simple new WordPress theme but all the tutorials you’ve seen are way too complex or don’t fit in at all with the existing WordPress look.
Solution: We’ve come up with a simple, useful list you can use for your next theme!
This list is constantly growing and we welcome your recommendations! Please consider contacting us if you’d like to suggest a new resource. Thank you!
Conclusion: If you’re starting out building WordPress themes or want to develop a system for building them more efficiently or robustly, how do you decide which approach to take? In this article, we have briefly listed resources about how WordPress themes work and then look at some of the different approaches to developing them from scratch. If you’ve found any trouble, or have any additional information that would make this better or more simple to understand, please let me know!
https://www.ashramtech.com/wp-content/uploads/2020/05/wordpress-581849_1280.jpg6821280Ashram Techhttps://ashramtech.com/wp-content/uploads/2020/05/ashramtech-logo-icon-e1595685534504.pngAshram Tech2021-12-18 17:37:502022-04-21 19:44:22A Comprehensive List of WordPress Theme Development Resources